Though Mac’s FileVault2 encrypts your entire startup drive, you can encrypt other internal (or external) hard drives as well. Once encrypted, you can configure the drives to decrypt automatically as OS X loads, or you can have the drive decrypt only when you need it. If you choose the “manual” option, a window will appear at startup asking you to supply the password for the encrypted drive (exclusive of your startup drive, you will see a window for each installed encrypted drive). Supplying the password decrypts the drive, and it becomes visible in Finder, and acts like any other drive. Choosing the “Cancel” option in the window closes the window and the drive remains encrypted, and unseen in Finder. As you will see below, you can mount an encrypted drive anytime by going to Disk Utilities, highlighting the drive you want to decrypt, and click the”Unlock” button.
Note: To encrypt an external drive, using the “manual” option is really a good idea. This adds an extra layer of security for the drive, further protecting data if the drive becomes lost or stolen.
To encrypt an extra internal (external) drive for your Mac, you will need a Mac with OS X (10.7.5 or later), and an installed blank hard drive.

Find the Disk Utility app in the Applications/Utility folder and open it.
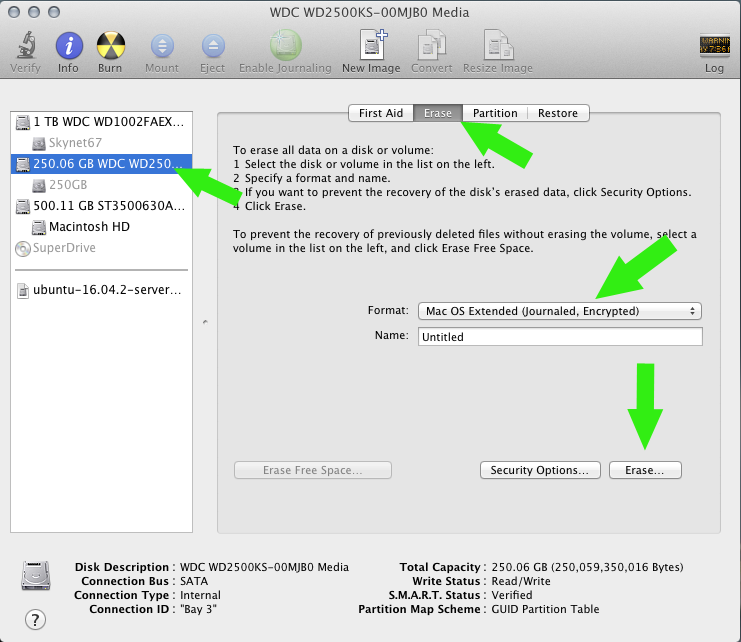
- Click the drive you want encrypted. (Green arrow, left side of Figure 1)
- This option assumes you will keep the drive’s existing partition: Click the “Erase” tab (Green arrow, top center of Figure 1). Under “Format”, click the drop-down arrows, and choose “Mac OS Extended (Journaled, Encrypted). Below the “Format” box, you can enter a name for your encrypted drive. Click the “Erase” button.Close Disk Utility and reboot the computer.
- If you wish to change partitions, instead of clicking the “Erase” tab, click the “Partition” tab. Adjust the “Partition Layout” to your liking. Next, complete the “Format” and “Name” options. Finally, click the “Apply” button.You will be prompted to create, enter, and verify a password. Then the drive will be encrypted. Close Disk Utility and reboot the computer.

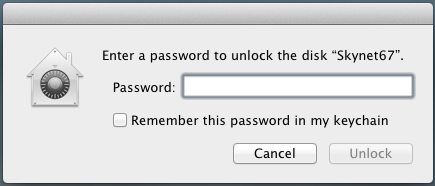
Once OS X has loaded, you are shown a window requesting your password for the encrypted drive (Figure 2). At this point, you can choose how you will use your newly encrypted drive. By clicking the box next to “Remember this password in my key chain“, the drive will automatically be decrypted every time you open OS X. To confirm this, click the “Unlock” button. You can close the drive at any time by “ejecting” the drive. To manually start the drive, simply click the “Cancel” button (from this point on, every time you start OS X, you will get the same Password window.

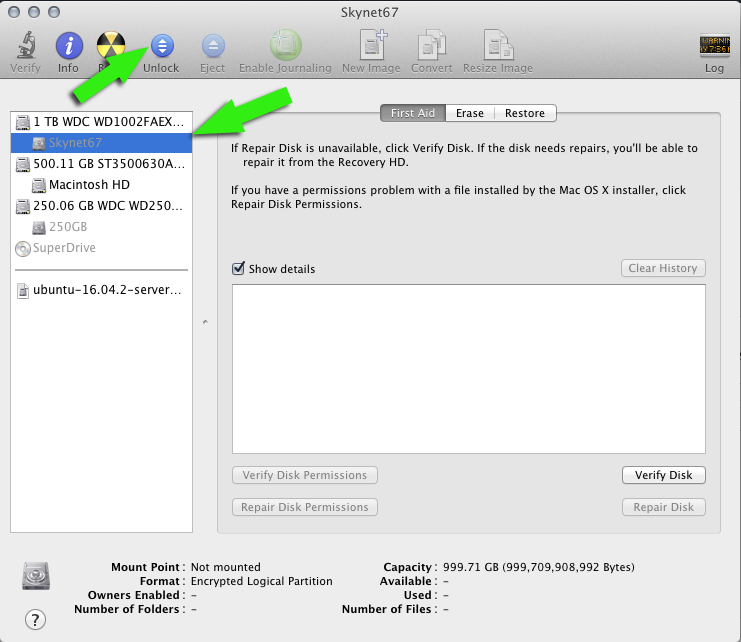
To open an encrypted drive, go to the Disk Utility app. Click the drive name of the drive you want to open. Next, click the “Unlock” button in the top tool bar. Once done, you will see the Password window to decrypt the drive (Figure 2).
