A couple of weeks ago, I wrote an article on how to run two computers with single keyboard and mouse. The software at the heart of this process is an open source item called Synergy. In the article, I also mentioned several different types of software using Synergy. In all the examples, you must have at least two computers on the same network. Moving the mouse on the Server (the computer with the keyboard and mouse) toward the Client (computer without the keyboard and mouse) will cause the mouse to actually appear on the client’s screen once the mouse reaches the corresponding edge on the server. For example: Suppose your client computer is to the right of the Server; when the mouse reaches the right edge of the Server, the mouse will disappear on the Server, and appear on the client. Once the mouse is on the client, the mouse and the keyboard will now function as if physically connected to the client. When moving the mouse to the left edge of the client computer, the mouse will disappear on the client, and reappear again on the server. In addition, all examples of the software allow you to copy text from one computer to the other. Finally, you can run a number of computers in the same manner, all with one keyboard and mouse.
Last week, I stumbled across some software that does everything the Synergy programs mentioned in my article do……….and more!!! The first is ShareMouse. Here are some of the Mouse and Keyboard sharing features (from their website: www.keyboard-and-mouse-sharing.com):
- Automatic and configuration-free monitor layout sensing.
- Any computer can remote control any other computer in any direction.
- Hotkeys can be defined to jump directly to a specific monitor.
- The Panic Button cancel/reset and current remote control session.
- Automatic dimming of inactive monitors.
- Cross-platform compatible with Mac OSX and Windows support.
- Vertical and horizontal wheel-mouse and Touchpad scrolling.
- Support for up to 26 monitors and computers.
- Support for Windows Fast User Switching and Windows Vista/7 User Account Control (UAC) pop-ups.
- Optional network traffic encryption.
- Portable mode for use with USB thumb drives.
File Exchange Features:
- Drag and drop and files from one computer to another.
- Support of drag & drop of multiple files.
- Progress bar and speedometer for larger file transmissions.
- Cancel-button to cancel file transmissions at any time.
Clipboard Sharing Features:
- The Clipboard Synchronization supports text, bitmaps, files and folders containing multiple files.
- Clipboard contents can be sent to a specific computer to avoid accidental overwrite of any computer’s clipboard.
- Clipboard Sharing works independently from Windows network file shares. No need to fiddle with network file sharing.
As you can see, the software is feature rich, and much more robust than the examples I discussed in my original article. In addition, it is very simple to setup. ShareMouse will work on 32/64 bit Microsoft XP/Vista/7, and on Max OSX Snow Leopard or Lion. It is free to non-power users, and I will refer you to their website for a description of what a “non-power user” is.
The second piece of software is Teleport. It offers many of the same features as ShareMouse. Check Teleport’s website (www.abysoft.com/software/teleport/) for the details. For my use, Teleport works perfectly (my PowerMac is running Leopard and ShareMouse does not support this version of OS X). Unlike ShareMOuse, Teleport is Mac only. Teleport is also Donation-ware.
Like ShareMouse, Teleport is easy to setup. Here is how to do it:
Once the software is installed, on the client computer, go to Settings > Other and click Teleport. When the pop-up window opens, click the boxes that say, “Share this Mac”, and “Activate Teleport”.
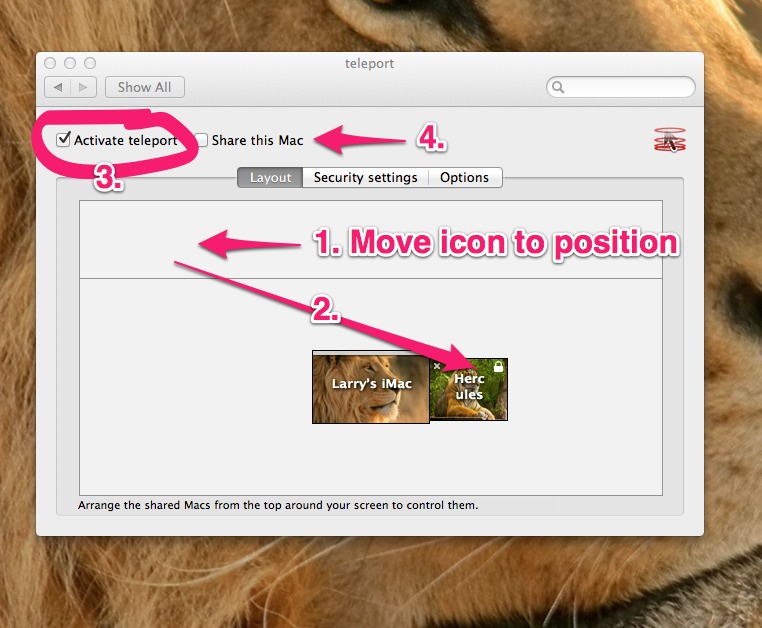
For the server computer, again, go to Settings > Other and click Teleport. Once this window opens, you will notice two icons, with a horizontal line between them. The icons above the line will show computers running Teleport on your network. Below the line is the icon for your server. Note the icons have the wallpaper and host name for each computer. In Steps 1 and 2, you move the icon for the client from “above the line”, to its relative position next to the server (if the client is right of the server on the desk, then move the icon to the right of the server icon). Step 3, click “Activate teleport”. Step 4, leave “Share this Mac” unchecked (the box is for the client only). At this point, you should be able to move your mouse to the right, “off” the server, and “on” the client. Note that when you are “on” the client, there is an icon on the center of the server’s screen with the name of the client, and while you are “on” the client, on the top tool bar, you will see, next to the Teleport logo, “controlled by (host name of server)”.
There are two other tabs, Security and Options. In Security, I would set up the encryption by checking the “Enable encryption” box, and following the instructions. The Options tab can be set to your taste, I found the default settings fine. Be sure to verify corresponding changes on both computers.
Both ShareMouse and Teleport blend your computers together, as well as truly extending your desktop through the use of two or more monitors. If you have two or more computers on your desk, you should give one of these options a try.
-Larry