The Case of the Missing EFI:
Yesterday, I installed a new hard drive on a mid-2012 MacBook Pro (here is a very good video on how to install the drive: https://www.youtube.com/watch?v=I7co5-qJhuM)[1]. The install itself is pretty straight forward, and within about 20 minutes the little MacBook was back together and ready to have the drive formatted, and a new operating system installed. I fired up the computer, held down the Command + R keys and waited to be booted to the OS X Utilities page, from where I could launch Disk Utilities, and eventually install OS X to the new hard drive. After a few moments, all I was able to see on the MacBook’s screen was an icon of a folder with a question mark on it. At this point I knew that like most “simple” jobs, this one may well launch me on a “complex” journey.
The first step to figure out was to decide what was missing in the equation? I then had a “Gee, I wished I would have that about this before” moment. Yep, I realized that when I removed the old hard drive, I also removed the yellow-brick-road to the MacBook’s EFI firmware (Apple’s answer to a PC’s Bios). Without help from the EFI, I was dead in the water.
My solution would be simple. I have a OS X 10.6 DVD. I thought I would install this version of OS X, then go to the APP Store, and download Yosemite. The world would be a better place, as my problems with the missing EFI would be over. It was indeed a good thought, and an exercise in futility. It seems that “Snow Leopard” was designed for Mac’s with fewer and slower processors than those in the Macbook Pro I was working on. As I tried to install the operating system, a kernel panic brought the process to an abrupt halt. So much for my bright ideas.
As I had run out of “rabbits” to pull out of my digital hat, it clearly was time for the Larry of LarryTalksTech to get some help. I then fired up my trusty iMac, and headed straight for the land of Google. In the end, I found two solutions: one nearly by accident without Google, and another with Google’s help.
The Easy Way
After doing about 20 minutes of research on how to install a bootable version of Yosemite to a DVD (you can also do this to a thumb drive – I just didn’t have any lying around my office at the time), I noticed a startup key combination that uses the “Option” key to temporarily change your startup disk. This process activates the Startup Manager.[2] As I didn’t have any other disks available from which to startup the MacBook, I wondered what would happen if I simply rebooted the MacBook and depressed only the “Option” key. It seemed to me that as I had no additional drives, this might re-direct me, via the internet, to Apple, where I might find a pathway to the OS X Utilities menu needed to install Yosemite. A stretch I know, but….

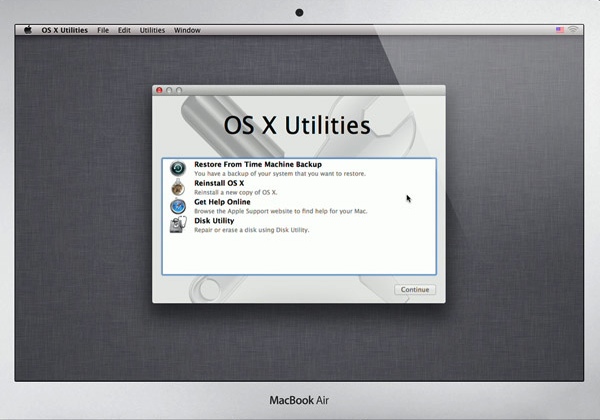
After depressing the “Start” button on the MacBook, and holding down the “Option” key, a few short moments elapsed and to my amazement a drop down box appeared toward the bottom of the MacBook’s screen. This box provided a list of the available WIFI networks around my home. I found my SSID, and supplied the password. After another moment, a button with an arrow (pointing to the top of the screen) appeared. I clicked it. Then, the OS X Utilities menu appeared on the screen. Now, I was ready to install my operating system.
I do not know if the “Option” key solution works on pre mid-2012 Macs. I also don’t know if this solution works on Macs after mid-2012. All I know is that this worked for me, and if your Mac has WIFI, it might work for you too. It is most certainly worth a try, and without a doubt, the easiest way to install OS X to a new hard drive. Note: The installation will only be for the original version of OS X installed on your Mac. For the MacBook I was working on, this operating system was Lion. Once installed, I went to the APP Store and installed Yosemite.
Other more involved options:
From my research, had my spelunking with the “Option” key failed, an article on MacWorld’s website proved to provide the best set of instruction for creating a bootable drive for the installation of the operating system (you can find it by clicking: http://www.macworld.com/article/2367748/how-to-make-a-bootable-os-x-10-10-yosemite-install-drive.html) [3]. The article presents two different pathways to create a bootable install drive, one with 6 steps, and one with 17 steps. It sounds more difficult than it really is, – once you have decided which pathway to use, just follow each step completely.
Finishing Up

Create a Partition and Format your drive. From the OS X Utilities window, click on Disk Utilities, then:
In the left-hand side bar, click on your new hard drive.
Now, at the bottom of the Partition Layout, click the “+” and from the drop-down box, select and, unlike the example in the above graphic, click one partition.
To name your partition, enter it in the Name field.
Next, make sure the Format is Mac OS Extended (Journaled)..
Next, click the Apply button at the lower right side of the window.
Finally, click out of the Disk Utilities window.

Once at the OS X Utilities window, click Reinstall OS X, and follow the prompts, The operating system will begin its download and installation.
Sources
1. 13-inch MacBook Pro Mid 2012 Hard Drive/SSD Installation Video | OWC | https://www.youtube.com/watch?v=I7co5-qJhuM
2. How to choose a startup disk on your Mac | Apple Support | https://support.apple.com/en-us/HT204417
3. How to make a bootable OX X 10.10 Yosemite Install Drive | Macworld |
http://www.macworld.com/article/2367748/how-to-make-a-bootable-os-x-10-10-yosemite-install-drive.html
You saved me! Thank you so much for the instructions!!
Machelle,
Glad the instructions worked for you.
Larry